
The wellness space in your home does not need to be a dedicated room or an expensive renovation. For many Australians, it is simply a corner of the bedroom, a section of the bathroom, or a cleared space in the living room that gets used intentionally each day. Red light therapy fits naturally into this kind of low-footprint home wellness setup, and getting the physical space right makes a meaningful difference to how consistently you actually use it.
StreamShop Australia stocks a range of formats to suit different home layouts and usage habits. Their red light therapy mat australia is particularly well-suited to home setups where floor space is the most flexible resource, allowing you to lie down and receive full-body treatment without needing a dedicated stand or wall mount. For those wanting a more structured setup, their range of panels, handheld devices, and wearables offers flexibility across every room in the house. If you are considering a red light therapy mat specifically, it is worth thinking through where in your home it will live and how you will integrate it into your daily routine before purchasing.
Why the Setup Matters
Consistency is the single most important factor in getting results from red light therapy. The science is clear that regular, repeated exposure over weeks and months produces cumulative benefits that sporadic sessions cannot replicate. And consistency, in practice, comes down to convenience. If using your device requires effort, if you have to move furniture, hunt for a power point, or remember where you stored it, you will use it less. If it is already set up, ready to go, and integrated into an existing routine, you will use it more.
Thinking carefully about where and how to set up your device before you start is one of the most practical things you can do to maximise your investment.
The Bedroom Setup
The bedroom is one of the most natural locations for a red light therapy setup, particularly for people using it to support sleep quality or as part of a morning or evening routine. Here is how to think about a bedroom setup:
- For a panel device: Mount the panel on the wall opposite your bed or on a freestanding stand positioned so you can sit or stand in front of it comfortably. A nightstand height of approximately 90 to 120cm is suitable for most seated or standing positions. Ensure the power cable is routed cleanly so it does not become a tripping hazard.
- For a mat device: Roll out the mat on the floor beside your bed, on top of a yoga mat or folded blanket for comfort. A 10 to 20 minute session lying on the mat in the morning or evening integrates naturally into the time you might otherwise spend scrolling on your phone.
- Timing note: In the evening, use red wavelengths rather than near-infrared for your final session of the day, as red light is less stimulating and more compatible with a wind-down routine.
The Bathroom Setup
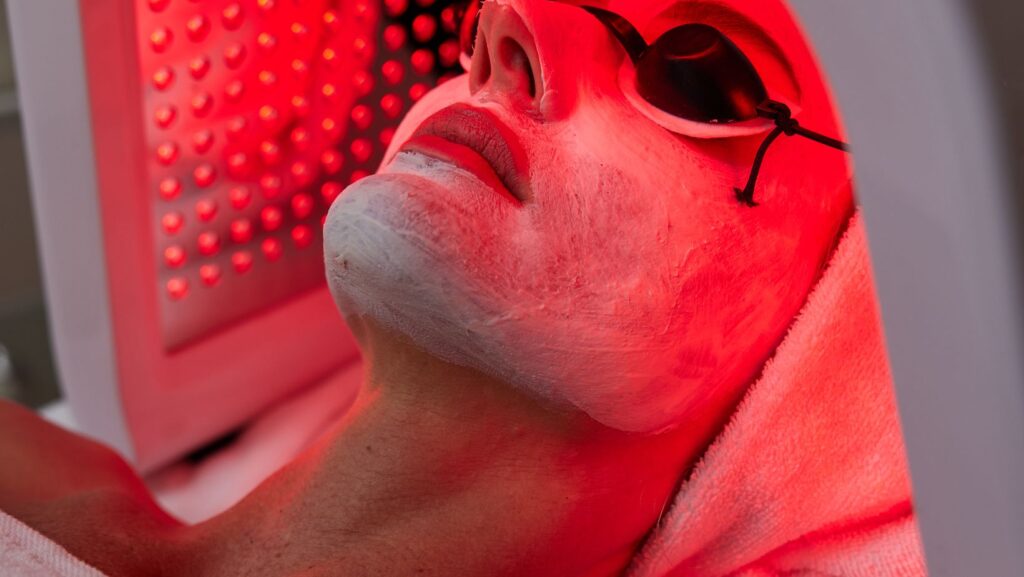
For facial-focused treatments, the bathroom is often the most practical location because it integrates naturally with an existing morning skincare routine. A compact facial panel or handheld device kept on the bathroom counter is easy to reach during the time you would already be in front of the mirror.
A few practical considerations for bathroom setups:
- Moisture and ventilation: Ensure the device is rated for bathroom use if it will be stored in a humid environment. Most devices are designed for dry indoor conditions, so if your bathroom gets steamy, store the device in an adjacent area and bring it in for use after the steam has cleared.
- Counter space: Facial panels typically have a compact footprint and can be stored upright in a corner of the vanity or in a drawer between uses.
- Mirror positioning: Some people find it helpful to use a facial device while facing the mirror so they can monitor their positioning and distance from the device without needing to look directly at the light.
The Living Room or Lounge Setup
For larger panel devices or full-body mats, the living room is often the most practical space, particularly for households where the bedroom is shared and using a device requires negotiating with a partner’s schedule.
Panel setups in the living room work well positioned near the couch or a comfortable chair, so you can sit or stand in front of the panel during an activity you already do, such as watching television, listening to a podcast, or reading. A freestanding panel with an adjustable stand can be moved to the side when not in use, keeping the space visually clean.
For mat users, rolling the mat out on the lounge floor for a 15 to 20 minute session in the evening is a genuinely pleasant experience, particularly when paired with a meditation, breathwork practice, or simply quiet rest. The mat can be stored rolled up behind a couch or in a wardrobe when not in use.
The Home Office or Study Setup
For people who work from home, the office or study is an underrated location for a red light therapy setup. A panel mounted on the wall behind your monitor, or positioned to the side of your desk, allows you to complete a session while working, reading, or taking a call. This is particularly effective for people targeting skin health or facial rejuvenation, where the face simply needs to be within range of the panel.
The key considerations for a home office setup are cable management, keeping the device positioned at the correct distance from your seated position, and ensuring the light does not create a glare issue on your monitor or interfere with video calls.
Dedicated Wellness Room or Spare Room
If you have the luxury of a spare room or a dedicated wellness space, a more comprehensive setup becomes possible. A full-body mat, a panel system, and targeted wearable devices can all coexist in a single room that is set up specifically for recovery and health protocols.
In a dedicated wellness room, consider:
- Mounting panels at multiple heights to allow both seated and standing treatment positions.
- Keeping a yoga mat or cushioned surface permanently laid out for mat-based sessions.
- Installing a dedicated power board with enough outlets to power multiple devices simultaneously if needed.
- Adding a small speaker or white noise machine to make the space more conducive to relaxation during sessions.
Practical Tips for Any Setup
Regardless of which room you choose, the following principles apply universally to getting the most from your home red light therapy setup:
- Measure your treatment distance: Most devices specify an optimal distance of 15 to 30cm. Use a tape measure to identify exactly where you need to be positioned, and mark that spot with a small piece of tape on the floor if it helps.
- Use a timer: Most sessions run between 10 and 20 minutes. A simple phone timer removes the guesswork and means you are not interrupting the session to check the time.
- Keep eye protection accessible: Store your protective eyewear with the device so it is always within reach. Making protection easy to access means you are more likely to use it consistently.
- Pair it with an existing habit: The easiest way to build consistency is to attach your red light therapy session to something you already do every day, whether that is your morning coffee, your evening news, or your pre-bed wind-down.
- Keep it visible: A device that lives in a cupboard gets used less than one that is already set up and visible. If space allows, keep your device in position and ready to use rather than packing it away between sessions.
The Bottom Line
Setting up a red light therapy station at home does not require a renovation, a dedicated room, or a large investment in furniture. It requires a small amount of planning, a reliable power point, and a clear sense of when and where you will use the device as part of your existing daily rhythm.
StreamShop Australia’s range is designed with home use in mind, offering devices in formats that suit a wide variety of living situations, from studio apartments to family homes. Whether you opt for a compact facial panel, a freestanding full-body system, or a versatile mat, the most important factor is finding a setup that removes friction from the process so that using the device becomes the path of least resistance, not an effort you have to talk yourself into.
The results of red light therapy are built through repetition over time. The right home setup is simply what makes that repetition possible.
More Stories
Smart Tech thehometrotterscom – Essential Gadgets, Apps, And Setups For 2026
Durostech Explained: What It Is, How It Works, And Why It Matters In 2026
GeekForce Network: The 2026 Guide To What It Is, How To Use It, And How To Grow Your Presence