

Ever wonder why seasoned RV owners always seem to have worry-free camping trips? A simple pre-season roof inspection might be their secret weapon.
Regular checks of your RV’s roof can prevent expensive water damage and extend the life of your vehicle, making it a crucial part of responsible RV ownership.
From examining seals around vents to checking for cracks and worn spots, this weekend project will give you the peace of mind to focus on what really matters: creating memorable adventures on the open road.
Spotting Trouble Early
Checking your RV roof before the camping season starts can save you from headaches down the road. A quick inspection of the surface helps identify potential problems like cracks, tears, or worn spots around seams.
I’ve found that catching these issues early can prevent costly water damage and repairs later on. In fact, proper care and inspection can extend your RV roof’s life by up to 50 percent longer.
Here’s what you should look for during your roof inspection:
- Visible cracks or splits in the roofing material
- Loose or peeling seams around edges
- Worn areas near vents and antennas
- Signs of water pooling or discoloration
- Gaps in sealant coverage
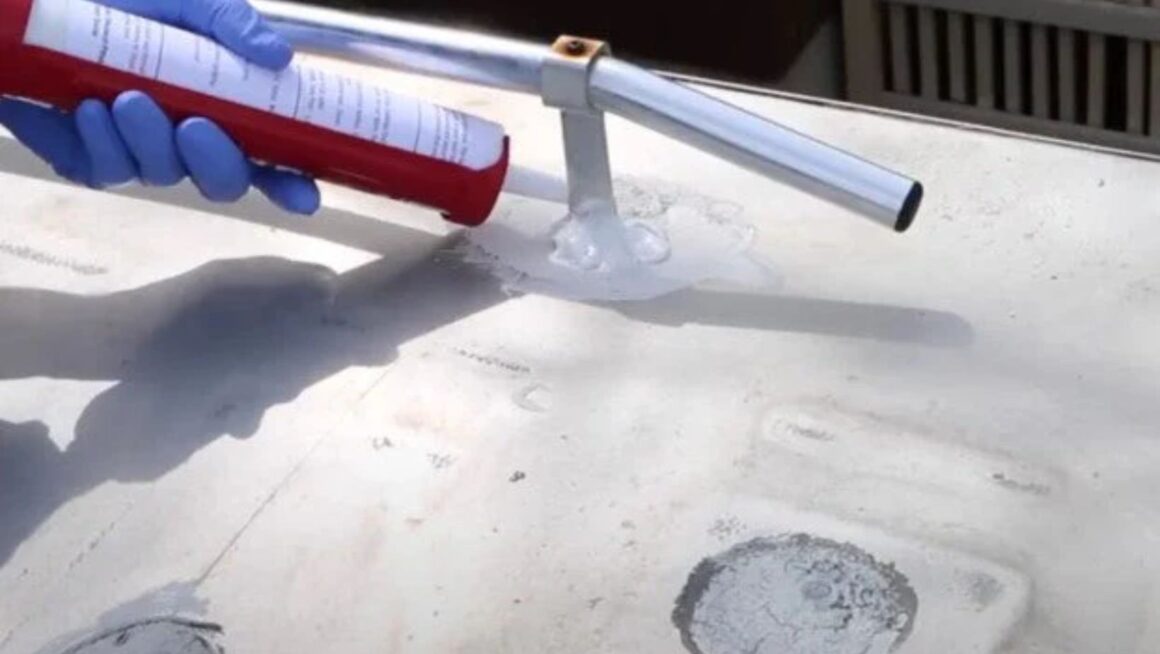
If you spot any loose or aging sealant during your check, don’t wait to fix it. Using a quality self-leveling lap sealant can quickly seal vulnerable areas and prevent moisture from seeping in.
Remember to pay extra attention to areas around roof penetrations like vents and antennas, as these spots are more likely to develop issues over time. A thorough inspection now means more worry-free camping adventures ahead.
Seal Checks and What to Watch For
A thorough inspection of your RV roof’s seals can mean the difference between a carefree journey and costly repairs.
The key spots you’ll want to check are where different materials meet or where components pierce through the roof’s surface. These vulnerable areas often show the first signs of wear, making them critical inspection points.
Using a systematic approach to checking seals can help identify small issues before they become major headaches. Systematic inspection methods have shown that regular checks can prevent up to 80% of common roofing problems.
Pay special attention to areas around air conditioners, vents, and antenna mounts, as these spots tend to experience the most stress from movement and weather exposure.
Here are the key areas to examine during your seal inspection:
- Seam connections where roof materials join together
- Areas around roof penetrations like vents and skylights
- Corner joints and edges where sealant is applied
- Spots showing signs of discoloration or bubbling
- Places where different materials meet, such as rubber-to-metal connections
Remember to gently press around sealed areas to check for any give or softness, which might indicate underlying damage. While inspecting, take photos of potential problem spots, this helps track changes over time and creates a maintenance history for your RV.
Cleaning for Longevity
A clean RV roof is a lasting roof. Regular cleaning helps safeguard your RV’s roofing material from harmful elements that can speed up deterioration. Whether you’ve got a rubber membrane, fiberglass, or metal roof, keeping it free from dirt and debris is vital for maintaining its protective qualities.
Your RV roof cleaning routine should include these key steps:
- Sweep off leaves, twigs, and loose debris before they decompose
- Use appropriate cleaning solutions based on your roof material type
- Scrub gently with soft-bristled brushes to avoid surface damage
- Pay extra attention to corners and areas around roof fixtures
- Apply protective coatings after thorough cleaning and drying
Maintaining a spotless roof surface isn’t just about appearances, it’s a smart preventive measure against moisture retention and mold growth. These unwanted visitors can quietly damage your roof’s structure if left unchecked.
By establishing a consistent cleaning schedule, you’ll help stop issues before they start and extend your roof’s life. Remember to check your manufacturer’s guidelines for recommended cleaners specific to your RV’s roofing material, as using the wrong products could do more harm than good.
Keeping Moisture Out
Testing your RV’s interior ceilings and walls for moisture should be a key part of your maintenance routine. Catching water issues early can prevent structural damage and expensive repairs down the road.
Regular checks using a moisture meter help identify hidden problems before they become visible to the naked eye.
A comprehensive inspection of your RV’s roof system includes checking both exterior and interior components. The moisture prevention program has shown that systematic maintenance can double the lifespan of your roof’s protective barriers.
Here’s what you’ll need to check during your moisture inspection:
- Soft spots in ceiling panels or wall materials
- Discoloration or staining around roof vents and seams
- Peeling wallpaper or bubbling surfaces
- Musty odors that might indicate hidden water damage
- Sagging or warped interior panels
A quick response to any signs of moisture is crucial. Don’t wait for visible water stains to appear – by then, significant damage might have already occurred. Keep records of your inspections and any repairs you make, which will help track problem areas and maintain your RV’s value over time.
Incorporating Roof Care into Your Routine
Setting up a consistent schedule for RV roof maintenance can feel natural once you’ve done it a few times. Spring is the perfect time to give your roof a thorough once-over, just before the camping season kicks into high gear.
Think of it like your RV’s annual health check-up, a chance to spot and fix small issues before they turn into bigger headaches.
Regular roof care should include checking key areas that often show wear and tear. You can start with the basics and work your way through these essential inspection points:
- Examine all roof seals and edges for signs of separation or aging
- Look closely at areas around vents, antennas, and other roof installations
- Check for any discoloration that might signal water damage
- Test the flexibility of rubber roofing material in different spots
- Clear any debris that’s collected over the winter months
Your preventive maintenance efforts can make a huge difference. Regular inspections can add years to your roof’s life. When you spot minor issues, quick fixes with quality materials like a reliable lap sealant can prevent water damage.
By making roof checks part of your spring ritual, you’re protecting your investment and ensuring countless worry-free adventures ahead.
Safeguard Your RV
Regular RV roof maintenance is more than just a checklist; it’s your ticket to worry-free adventures and protection for one of your biggest investments.
A simple weekend of careful inspection and preventive care can save you from costly repairs and extend your RV’s lifespan significantly.
Remember, maintaining your RV roof isn’t just about preserving the vehicle; it’s about safeguarding all the memorable camping trips and family adventures that await you down the road.
More Stories
AC Replacement: Signs Your Unit Needs an Upgrade
Low-Budget Tradeshow Giveaway Ideas That Still Impress Visitors
How Digital Trends Influence Today’s Modern Interior Design