
You’ve got an old house with charm to spare—and a ceiling fan that rattles like loose change in a dryer. This single, complete guide shows you exactly how to replace your ceiling fan in an old house safely, cleanly, and confidently. You’ll learn how to verify your ceiling box, deal with older wiring and plaster, pick the right fan, and wire it the right way—plus a couple of quick formulas to size downrods and estimate real energy savings.
What Makes Replacing a Ceiling Fan in an Old House Different?
Older homes (pre‑1970s—and especially pre‑1940s) often have brittle plaster‑and‑lath ceilings, shallow or non‑rated ceiling boxes, and occasionally no equipment grounding conductor at the fan location. All three change how you plan the job. This article keeps every step focused on replacing your ceiling fan in an old house—no fluff, just the tools, methods, and judgment calls that matter.
Before you touch a wire: inspect the existing ceiling box and support in your old house.
Safety & Code Essentials (Old‑house Edition)
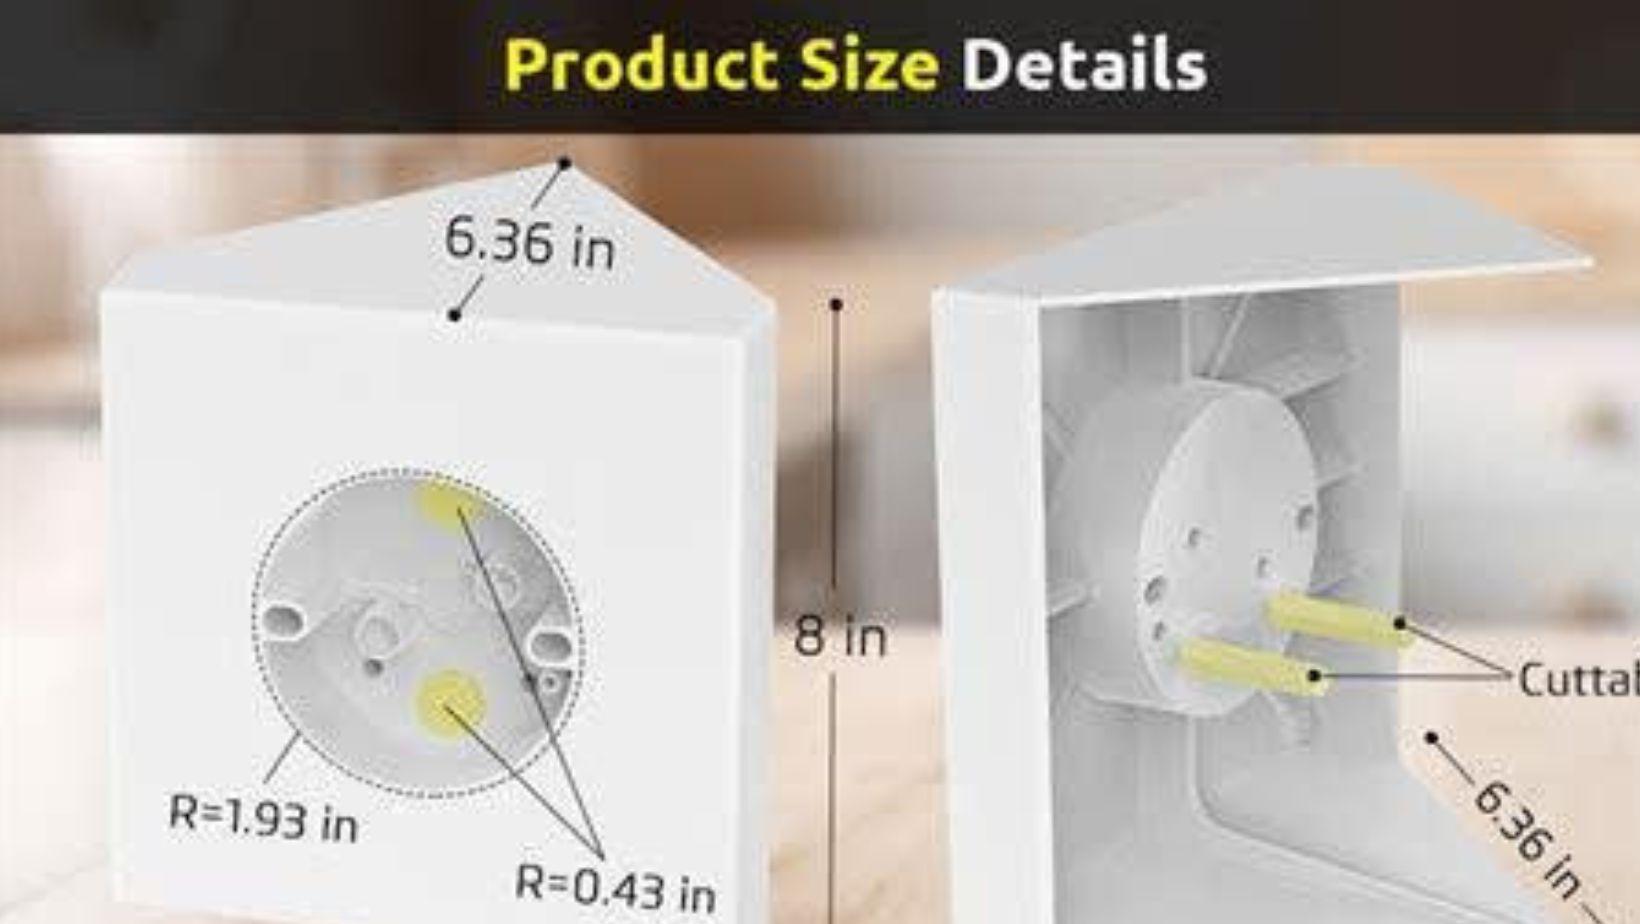
1) The box above your fan must be fan‑rated. Modern code requires a box listed for the sole support of a ceiling‑suspended (paddle) fan—or a box that provides direct access to framing capable of supporting an approved fan bracket. Look for embossed labeling inside the box or on the bar hanger; fan boxes are typically marked for 35 lb or 70 lb support. If your old house has a typical thin, “pancake” light‑only box, replace it with a listed fan‑rated box or brace kit.
2) Mounting height. For safety and airflow, fan blades should be at least 7 ft above the floor and roughly 8–9 ft is best when ceiling height allows. That’s standard guidance from ENERGY STAR and manufacturers, and it’s what inspectors expect to see.
3) Direction matters for comfort. Summer: counterclockwise to create a cooling breeze. Winter: clockwise on low to gently push warm air down. This helps comfort at the thermostat setting you already use.
 4) About older wiring. If you discover knob‑and‑tube or any circuit without an equipment ground at the fan location, pause. A ceiling fan is metallic, moving equipment overhead; proper grounding and a fan‑rated box are non‑negotiable. When grounding is absent, the typical safe fix is to run a new cable with an equipment grounding conductor from a properly grounded junction or panel—work best evaluated by a licensed electrician and governed by NEC grounding/bonding rules.
5) Check for recalls. Before installing any new fan or light kit, search the U.S. Consumer Product Safety Commission (CPSC) recall database by brand/model.
Quick Path Chooser: Three Practical Ways to Replace a Fan in an Old House
Pick the path that matches your ceiling, access, and wiring. All are compatible with plaster‑and‑lath if you work slowly, use the right anchors, and protect the plaster edges with a patch ring if needed.
“`
| Method | Most When | Approx. Steps (count) | Typical Time (min) |
| Old‑work brace kit from below | No attic access; weak/suspect box | 6 | 45–75 |
| Joist‑mounted fan box from attic | Attic above room; easy joist reach | 8 | 60–90 |
| Blocking + new fan box (patch) | Severely off‑center or damaged area | 10 | 120–180 |
Key takeaway: In most old houses without attic access, a fan‑rated old‑work brace box is the quickest, least invasive solve. If you have attic access, a direct joist‑mounted fan box is robust and tidy.
“`
Tools & Materials You’ll Actually Use
- Non‑contact voltage tester; basic multimeter (verify power is off—every time you touch wires).
- Fan‑rated ceiling box or a brace kit listed for 35 lb or 70 lb (choose what your fan requires).
- Driver/drill with #2 Phillips and nut drivers; wood/metal screws as specified by the box.
- Assorted wire connectors (lever or twist), electrical tape, and ground pigtails.
- Patch ring (for plaster edges), utility knife, dust protection.
- New ceiling fan (ENERGY STAR if possible), downrod if needed, and balancing kit.
“`
| Item | Buy or Borrow | Typical Price (USD) | Notes |
| Voltage tester | Purchase | $20 | Use on every wire before handling |
| Fan‑rated brace box |
Purchase |
$30 | Choose 35 lb or 70 lb rating |
| Wire connectors (pack)
|
Purchase | $6 | Lever style is fast & tidy |
| Downrod (12–18″) |
Purchase |
$20 | Match fan brand & finish |
| Plaster patch ring | Purchase | $10 | Saves chipping edges |
Acquisition tip: search “fan‑rated brace box kit” or “ceiling fan old‑work box” at your favorite hardware retailer; check that the product page explicitly states “listed for fan support” and the weight rating.
“`
Step‑by‑step: Replacing Your Ceiling Fan in an Old House (brace‑box path)
“` Wiring and hardware overview—keep conductors and grounds organized as you go.
- Power off—confirm twice. Turn off the breaker you believe feeds the room. Then use a non‑contact voltage tester at the switch and at the ceiling box. Old houses can hide multi‑wire or back‑fed circuits; don’t assume.
- Remove the old fan or fixture. Support the motor as you remove canopy screws. Photograph the wiring before disconnecting—old paint can hide color codes.
- Assess the existing box. If it’s not explicitly marked for fan support (you should see a rating and a “fan support” listing), replace it with a fan‑rated box. Boxes must be listed for sole support of a ceiling‑suspended fan or provide access to framing for an approved bracket, per NEC 314.27(C).
- Install an old‑work brace box (no attic access). Expand the opening carefully. Insert the telescoping brace through the hole and crank it until it bites both joists. Add the fan‑rated box on the brace plate, aligning the screws with the intended fan canopy orientation. Tighten until solid—no wobble.
- Repair & prep the opening. If plaster is fragile, install a patch ring under the canopy. This prevents cracks from spreading.
- Mount the bracket. Use the bracket provided with your fan—no substitutions. Tighten to spec. Verify that the safety cable (if provided) has an approved anchor point.
- Wire the fan. Typical single‑switch: house black (hot) → fan black; house white (neutral) → fan white; ground (green/bare) → bracket and fan green. If your fan has a separate light lead (blue) and you have only one switched hot, tie blue and black together. Use listed connectors and tug‑test each splice. If you install a remote receiver, follow the diagram exactly.
- Hang, assemble, and balance. Seat the motor on the hook (if your bracket has one), tuck conductors carefully, attach the canopy, install blades per the sequence, and use the balancing kit if you see wobble at medium speed.
- Test. Restore power, test on low/medium/high, then test the light. Verify no rubbing sounds or canopy movement. Re‑check that pull‑cords don’t hit blades.
Key takeaway: The fan‑rated box and solid bracket are the backbone of a safe installation in an old house. If you cannot confirm the box is listed and properly supported, replace it before proceeding.
Alternate Paths (When Conditions Differ)
1) Joist‑mounted fan box from the attic
If you can get above the ceiling, mount a listed fan box directly to a joist or between joists with a listed bar hanger. This is often the most rigid support. Use a short downrod or flush mount to keep blades at 7–9 ft above the floor.
2) Blocking + new fan box (cut‑patch)
When the old opening is off‑center, damaged, or the joist location is awkward, cut back to a clean rectangle, add blocking between joists, mount a fan‑rated box to the new blocking, then patch the area. It’s slower but results in a perfectly centered, rock‑solid mount.
3) Special old‑house wrinkles
- Two‑wire, no ground: Don’t “invent” a ground to a random pipe or rod. If the fan box isn’t served by an equipment grounding conductor, the safe, code‑compliant solution is to run one with a new cable or wiring method back to a grounded source. Consult a licensed electrician.
- Knob‑and‑tube present: Stop and get a professional evaluation. K&T lacks a grounding conductor and has specific restrictions; covering it with insulation or disturbing it can create hazards.
- Plaster‑and‑lath: Score the paint line first, support the area, and use a patch ring to prevent spider cracks at the canopy edge.
Choosing the Right Replacement Fan (Old‑house Priorities)
- Size for the room: 29–36″ for up to ~75 ft², 36–42″ for 76–144 ft², 44″ for 144–225 ft², and 50–54″ for 225–400 ft² are long‑standing rules of thumb echoed by ENERGY STAR and the American Lighting Association; they work well in boxy rooms common to older homes. Keep blades 18″ from walls.
- Efficiency: ENERGY STAR‑certified ceiling fans use efficient motors and blades; the Most Efficient 2025 list highlights top performers if you care about noise and airflow per watt.
- Weight rating: Match your fan’s weight to the box rating (common thresholds: 35 lb and 70 lb).
- Controls without re‑wiring: If your old house has one switch and you want independent light/fan control, choose a fan with an integrated remote/receiver or add a listed canopy receiver.
- Mounting style: For 8‑ft ceilings, choose flush or short downrod; for 9–10 ft, choose a downrod that places blades at ~8–9 ft (use the formula below).
“` Light‑only box vs. fan‑rated box: the fan‑rated hardware is heavier, braced, and clearly marked. “`
Two Practical Formulas You Can Use
Formula A — Downrod length for ideal blade height
Downrod length (inches) = Ceiling height (inches) − Target blade height (inches)
Pick a target blade height of 96″ (8 ft) to 102″ (8.5 ft) depending on your room and headroom.
- Example 1: 9‑ft ceiling (108″) and you want blades at ~96″ → 108 − 96 = 12″ downrod.
- Example 2: 10‑ft ceiling (120″) and you want blades at ~102″ → 120 − 102 = 18″ downrod.
Key takeaway: This keeps blades safely ≥7 ft above the floor while staying in the 8–9 ft airflow sweet spot. Always confirm the manufacturer’s minimums and your local code interpretation.
Formula B — Net cooling cost with a fan vs. AC
Net cost (or savings) per day = (AC_kW × Hours_saved × $/kWh) − (Fan_kW × Fan_hours × $/kWh)
Plain language: Take the electricity cost you avoid by running your AC less, then subtract the tiny cost to run the fan.
- Example: Your central AC draws ~2.5 kW. You run it 6 hours on hot days. With a ceiling fan, you keep comfort while trimming AC runtime by 15% (0.9 hours). Your fan uses ~0.03 kW (≈30 W) for the same 6 hours. If the average U.S. residential rate is about $0.17/kWh in 2025, your net daily savings is:
- AC savings: 2.5 × 0.9 × $0.17 = $0.38
- Fan cost: 0.03 × 6 × $0.17 = $0.03
- Net ≈ $0.35/day (~$10.50/month for 30 hot days)
Rates vary by location, but EIA’s 2025 outlook pegs the nationwide residential average near $0.17/kWh, which makes this math realistic.
Real‑life Old‑house Scenarios (And How to Adapt)
Scenario 1 — 1925 bungalow, no attic access
Problem: A wobbly fan hangs from a thin metal pancake box. Plaster is hairline‑cracked around the canopy. Fix: Remove the fan; replace the box with a fan‑rated old‑work brace box; add a 1/8″ patch ring under the canopy to stop chipping; use a hugger or short downrod to keep blades ≥7 ft; balance blades.
Scenario 2 — 1908 foursquare, one switch controls both light and fan
Problem: You want separate control of light/fan without opening walls. Fix: Choose a fan with an integrated canopy receiver (or add a listed receiver) and pair it with your existing single switched hot. Keep neutrals together, ground everything, and label the wall switch as “fan power.”
Scenario 3 — 1940s cape, sloped ceiling
Problem: The fan scrapes the slope and flickers lights at medium speed. Fix: Use a slope‑rated mounting kit and a longer downrod calculated from Formula A; ensure 18″ blade‑to‑wall clearance and re‑balance blades.
Hugger vs. downrod: pick what keeps blades in the 8–9 ft zone without crowding walls or slopes. “`
Time you’ll Actually Save Each Week (small changes, real wins)
| Scenario (typical week) | Method used | Time saved/week | Why it helps |
| Balancing after install | Use included balancing kit | 20–30 min | Avoids re‑hanging or returns later |
| Switching light/fan separately | Canopy receiver remote | 10–15 min/day | No ladder trips just to change speed/brightness |
| Cleaning blades monthly | Dust‑once habit | 15 min | Cleaner blades = less wobble/noise later |
Key takeaway: The right hardware and minor habits reduce rework and noise—the two biggest time drains after you replace a fan in an old house.
Common Mistakes in Old Houses (and How You’ll Avoid Them)
- Mistake 1: Reusing a light‑only box. It’s not listed for dynamic loads. Install a fan‑rated box or brace kit before hanging anything that spins. :contentReference[oaicite:15]{index=15}
- Mistake 2: Ignoring blade height. In tight rooms, switching to a hugger or using the right downrod (Formula A) keeps blades safely ≥7 ft and improves airflow. :contentReference[oaicite:16]{index=16}
- Mistake 3: Assuming ground exists. Many old fan locations lack a grounding conductor. Don’t “fake” a ground; run a new EGC with the circuit if needed. :contentReference[oaicite:17]{index=17}
Energy & Comfort: What to Expect After the Swap
Fans don’t lower room temperature, but the breeze can make you feel cooler at the same thermostat setting, allowing you to run your AC a bit less. Use Formula B with your own hours and your utility rate (check your bill) to estimate your savings. DOE’s guidance on fan use (summer vs. winter) helps you lock in comfort without touching the thermostat as often. :contentReference[oaicite:18]{index=18}
For a quick benchmark, EIA’s Short‑Term Energy Outlook expects 2025 U.S. residential electricity prices to average about $0.17/kWh, which makes a modern, efficient fan a very cheap comfort upgrade to run. :contentReference[oaicite:19]{index=19}
Shopping: Verify Efficiency and Compatibility in Minutes
When replacing a fan in an old house, quieter, more efficient DC‑motor models are worth it—especially if you run them many hours. ENERGY STAR’s product finder lets you filter by size, airflow, and efficiency, and you can cross‑check local rebates. :contentReference[oaicite:20]{index=20}
“` Use a quick spreadsheet (or the formula above) to estimate your fan + AC energy tradeoff. “`
FAQ: Replacing a Ceiling Fan in an Old House
Do I need a permit? Requirements vary by jurisdiction. If you’re only replacing a fan and not altering wiring methods, many areas allow it as minor work; always check local rules.
My old house has only one switch—can I still have separate light and fan control? Yes. Use a fan with an integrated remote/canopy receiver, or add a listed receiver. It’s the fastest path without opening plaster.
How do I know if the box is fan‑rated? It will be labeled/marked, often with a weight rating (e.g., 35 lb or 70 lb) and language indicating suitability for “ceiling‑suspended (paddle) fan” support. :contentReference[oaicite:21]{index=21}
What if I see knob‑and‑tube? Stop, photograph, and consult a licensed electrician. Replacement often involves running new cable with a ground and decommissioning the K&T in that area. :contentReference[oaicite:22]{index=22}
Helpful, Trustworthy Resources (Each Link Says Exactly Why You’d Click)
- ENERGY STAR — Ceiling Fan Basics: clear guidance on placement, including the “7‑foot minimum” and 8–9 ft best‑practice height (plus size suggestions).
- U.S. DOE Energy Saver — Fans for Cooling: seasonal direction tips and when fans help keep you comfortable without constantly lowering the thermostat.
- ENERGY STAR Product Finder — Certified Ceiling Fans: filter by blade span, airflow, and efficiency; find rebates from local utilities.
- U.S. EIA — Electric Power Monthly (Average Retail Price): see current residential electricity prices to plug into Formula B.
- CPSC — Recall Search: check your new fan or light kit for recalls before you install.
- Leviton Captain Code — NEC 314.27(C) Summary: plain‑English explanation of the fan‑rated box requirement and markings.
Troubleshooting After the Swap
- Persistent wobble: Verify blade screws and irons are tight; swap opposite blades to isolate the heavy one; use the balancing kit.
- Hum or buzz: Ensure the canopy isn’t pressing on the motor housing; check that the brace is torqued tight and not flexing the ceiling; confirm the box is fan‑rated.
- Light flicker: Use dimmable bulbs matched to your control type; avoid mixing CFLs and LEDs on older dimmers.
- Remote glitches: Verify line/hot in and switched hot out wiring on the receiver; replace batteries; ensure the antenna isn’t pinched in the canopy.
Why These Steps Work (old‑house logic)
Cause → effect clarity: A listed, fan‑rated box resists vibration and dynamic load that a light‑only box was never designed for; that prevents loosening fasteners, wobble, and electrical arcing over time. Mounting height at or above 7 ft reduces injury risk and improves airflow. Using efficient fans means your comfort relies less on long AC run times, which lowers your energy bill at today’s rates. :contentReference[oaicite:23]{index=23}
Final Checklist to Replace your Ceiling Fan in an Old House
- Power off at breaker; confirm with tester.
- Remove old fan; inspect existing box and support.
- If not clearly fan‑rated, replace with listed fan‑rated box (35 lb or 70 lb as needed). :contentReference[oaicite:24]{index=24}
- Mount bracket per manufacturer; verify blade height meets 7‑ft minimum (aim for 8–9 ft). :contentReference[oaicite:25]{index=25}
- Wire hot/neutral/ground properly; add canopy receiver if you want separate controls without new cable.
- Assemble, test, balance; confirm correct seasonal direction. :contentReference[oaicite:26]{index=26}
- Check your model against the CPSC recall database. :contentReference[oaicite:27]{index=27}
Closing thought
When you’re replacing your ceiling fan in an old house, success comes from three things: a listed fan‑rated box, correct height and solid mounting, and clean, grounded wiring. Do those right, and your upgrade will be safer, quieter, and more comfortable—without sacrificing the historic character you love.
More Stories
For Better Safety, Efficiency, and Access Turn to Mobile Aerial Platforms!
Your Guide to the Ideal Situs Togel for Mobile Gaming
Why Sacramento’s Food Scene is World-Class